Skip to content

Advanced shading

Here are some shading techniques that were not covered in the previous tutorials.

Reflection

Reflection is the process of bouncing a ray off of a surface. The Shader class has a method called Reflect that can be used to create a reflection ray easily. Let's create a shader that reflects rays off of any objects with the name 'Mirror'.

Mirror shader example
 1
 2
 3
 4
 5
 6
 7
 8
 9
10
11
12
13
14
15
16
17
18
19
20
21
22
23
24
-- ModuleScript

local Shader = require(script.Parent.Parent.classes.Shader)

local MirrorShader = Shader.new()

MirrorShader.Function = function(Ray, Hit, ...)
    -- If the ray didn't hit anything, skip this shader.
    if not Hit then return end

    -- Only apply the shader to objects whose name is 'Mirror'.
    if Hit.Instance.Name == 'Mirror' then
        -- Get the normal of the surface that was hit.
        local Normal = Hit.Normal

        -- Create a reflection ray and return the color of the reflected ray.
        -- The Reflect method will copy all shaders from the original ray to the new ray
        -- and handles bounce limiting.
        Ray.Out.Color = Shader:Reflect(Ray, Hit, Normal).Color
        return Ray.Out
    end
end

return MirrorShader


Refraction

Refraction is the process of bending a ray at the interface of two transparent objects. The Shader class has a method called Refract that can be used to create a refraction ray easily. Let's create a shader that refracts rays off of any objects with the name 'Glass'.

Glass shader example
 1
 2
 3
 4
 5
 6
 7
 8
 9
10
11
12
13
14
15
16
17
18
19
20
21
22
23
24
-- ModuleScript

local Shader = require(script.Parent.Parent.classes.Shader)

local GlassShader = Shader.new()

GlassShader.Function = function(Ray, Hit, ...)
    -- If the ray didn't hit anything, skip this shader.
    if not Hit then return end

    -- Only apply the shader to objects whose name is 'Glass'.
    if Hit.Instance.Name == 'Glass' then
        -- Get the normal of the surface that was hit.
        local Normal = Hit.Normal

        -- Create a refraction ray and return the color of the refracted ray.
        -- The Refract method will copy all shaders from the original ray to the new ray
        -- and handles bounce limiting.
        Ray.Out.Color = Shader:Refract(Ray, Hit, Normal, 1.5).Color
        return Ray.Out
    end
end

return GlassShader


Custom buffer output

As a new feature in version 2, each TracedRay has an Out property that can be used to store custom data. This is useful if you want to create new buffers that are not part of the standard output.

To write custom data to the output, we must first create a new buffer before calling the Render method. This can be done by calling the CreateBuffer method on the RayTracer object.


Let's create a new buffer called Neon that uses black as a default value for each pixel.

myRayTracer:CreateBuffer('Neon', Color3.new(0, 0, 0))


Now let's write a create that writes the color of an object to the Neon buffer if the object's material is Neon.

Neon shader example
 1
 2
 3
 4
 5
 6
 7
 8
 9
10
11
12
13
14
15
16
17
18
-- ModuleScript

local Shader = require(script.Parent.Parent.classes.Shader)

local NeonShader = Shader.new()

NeonShader.Function = function(Ray, Hit, ...)
    -- If the ray didn't hit anything, skip this shader.
    if not Hit then return end
    -- Only apply the shader to objects whose material is Neon.
    if Hit.Material == Enum.Material.Neon then
        -- Write the color of the object to the Neon buffer.
        Ray.Out.Neon = Hit.Instance.Color
        return Ray.Out
    end
end

return NeonShader


Now let's apply this shader to the scene and see what the Neon buffer looks like.

Image of the Neon buffer using a scene with 2 neon spheres of different colors.

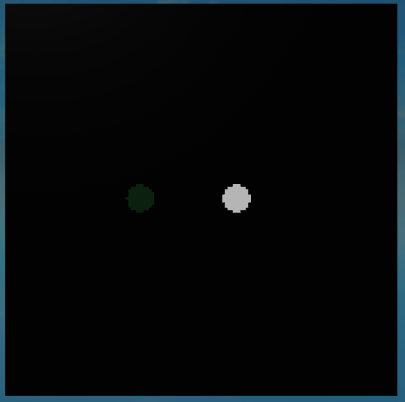
Custom buffers such as this can be useful for certain types of post processing effects.


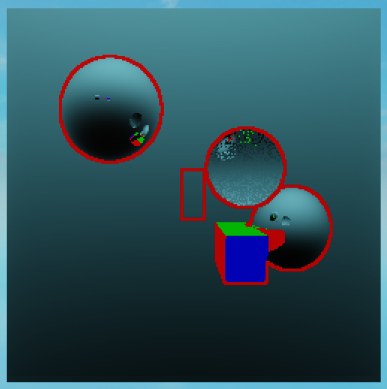
Here's another example of what you can do with the Shader and PostProcessingShader classes.

Example scene using glass and mirror shaders


Disclaimers

Important

Remember to adjust your RayTracer MaxBounces setting to match the number of bounces you want.

Warning

Some shaders may produce noisier results than others. Path tracing is very sensitive to noise, which becomes more noticeable as a ray bounces more times.