Creating your first shader
Now that we have a camera and a RayTracer, we're ready to start defining shaders. If you skipped the previous section, here is the code we've written so far:
Full script so far
1 2 3 4 5 6 7 8 9 10 11 12 13 14 15 16 17 18 19 20 21 22 23 24 25 26 27 28 29 30 31 32 33 34 35 36 37 38 39 40 41 | |
What is a shader?
If you already know what a shader is, you can skip to the next section. Otherwise, here is a quick explanation.
A shader is a set of instructions that define how a pixel should be colored based on several factors such as the position of the camera and the position of the object being rendered. Normally shaders run on the GPU, but since this is Roblox, we'll have to settle for running them on the CPU. This is not great for performance, as even a 640x480 image has a lot of pixels that need to be calculated, and a CPU only has a handful of cores unlike a GPU, which can have thousands of cores calculating the shaders for several pixels at a time.
How do shaders work with the RayTracer?
Luau Ray Tracer is a library that allows you to define shaders in Lua. Luau shaders are defined as objects that inherit from the Shader class. Each shader has a function which determines how a pixel should be colored, and if more rays should be created to simulate phenomena like reflection and refraction.
When a TracedRay terminates for any reason (i.e. it hits an object or the far plane), the shader is called to determine the color of the pixel. If the shader returns a color, that color is used to color the pixel. If the shader returns nil, the pixel will keep its current color.
Example Shader
Here's an example shader that makes every Part whose name is 'Mirror' to reflect the ray.
-- ModuleScript
local Shader = require(script.Parent.Parent.classes.Shader)

local MirrorShader = Shader.new()

MirrorShader.Function = function(Ray, Hit, ...)
    -- If the ray didn't hit anything, skip this shader.
    if not Hit then return end

    -- Only apply the shader to objects whose name is 'Mirror'.
    if Hit.Instance.Name == 'Mirror' then
        local Normal = Hit.Normal
        local out = Ray.Out
        -- Create a reflection ray and return the color of the reflected ray.
        out.Color = Shader:Reflect(Ray, Hit, Normal).Color
        return out
    end
end

return MirrorShader
Creating a shader
Let's create a shader that displays the color of an object if a ray hits it. We'll define the shader in a separate ModuleScript. For simplicity, we'll create a new folder called shaders in the package folder. We'll then create a ModuleScript called TestShader in the shaders folder.
-- ModuleScript

-- We'll begin by including the Shader class.
-- Since the ModuleScript is in package.Shaders, we can use a relative path to the Shader class.
local Shader = require(script.Parent.Parent.classes.Shader)

-- Create a new shader.
local TestShader = Shader.new()

-- Define the function of the shader.
TestShader.Function = function(Ray, Hit, ...)
    -- If the ray didn't hit anything, skip this shader.
    if not Hit then return end
    -- Return the color of the object that was hit.
    Ray.Out.Color = Hit.Instance.Color
    return Ray.Out
end

-- Finally return the shader so we can use it.
return TestShader
Now we'll also need to require the shader in our main script. We'll do this at the top of our script.
local TestShader = require(package.shaders.TestShader)
Next, let's apply the shader to our ray tracer. We'll have to replace the current Ray Tracer definition with our new one.
local myRayTracer = RayTracer.new(myCamera, 1, {TestShader})
Full script so far
1 2 3 4 5 6 7 8 9 10 11 12 13 14 15 16 17 18 19 20 21 22 23 24 25 26 27 28 29 30 31 32 33 34 35 36 37 38 39 40 41 42 | |
Let's see what our image looks like.
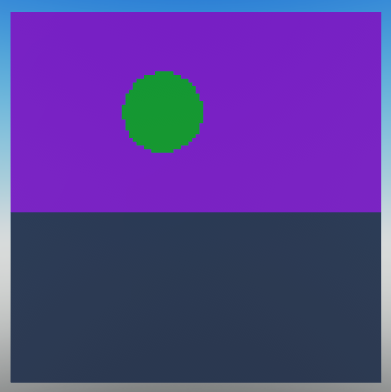
It would seem that the shader is working as expected. If we put a green sphere in the scene, the sphere should be green in the final render as well.
Tip
Set the parts in your test scene to invisible so they don't block your view. Because we haven't defined a transparency shader, parts will be rendered as a solid color regardless of their transparency property.
There is one problem with this shader. If a ray doesn't hit anything, it will keep its current color. Because we haven't defined a shader for rays that terminate without hitting anything, the sky is displayed as magenta. We'll deal with this in the next section.