In the previous part we created a shader that displayed the color of an object if a ray hits it. If a ray didn't hit anything, no shader was applied, resulting in the sky appearing as magenta.
Let's create a shader that is only applied if a ray doesn't hit anything. Just like before, we'll define the shader in a ModuleScript located in the shaders folder.
-- ModuleScriptlocalShader=require(script.Parent.Parent.classes.Shader)localSkyShader=Shader.new()-- Define the function of the shader.SkyShader.Function=function(Ray,Hit,...)-- If the ray hit something, skip this shader.ifHitthenreturnend-- Let's return a solid light blue color to represent the sky.Ray.Out.Color=Color3.new(0.5,0.5,1)returnRay.OutendreturnSkyShader
Now let's add the sky shader to our ray tracer. First we'll have to require the shader in our main script.
localSkyShader=require(package.shaders.SkyShader)
Just like we did with the first shader, we'll replace the current Ray Tracer definition with our new one. This time we'll include both the sky shader and the first shader.
localRayTracingCamera=require(package.classes.RayTracingCamera)localRayTracer=require(package.classes.RayTracer)localTestShader=require(package.shaders.TestShader)localSkyShader=require(package.shaders.SkyShader)-- We'll use a resolution of 100x100 to avoid having to wait too long for the render to complete.localresolution=Vector2.new(100,100)localfieldOfView=math.rad(70)-- Field of view is measured in radians.localnearPlane=0.1-- The near plane determines how close the camera can be to an object before it is clipped.localfarPlane=100-- How far the camera can see.-- We'll place the camera 5 studs above the world origin.-- Because we're not defining a direction, the camera will be looking down the -Z axis.localCFrame=CFrame.new(Vector3.new(0,5,0))-- Create the camera.localmyCamera=RayTracingCamera.new(resolution,fieldOfView,nearPlane,farPlane,CFrame)-- We won't be defining shaders just yet, so we don't need to pass any parameters except the camera.localmyRayTracer=RayTracer.new(myCamera,1,{SkyShader,TestShader})localimage=myRayTracer:Render()functionshowImage(image)forx=1,#imagedofory=1,#image[x]dolocalpixel=Instance.new("Part")pixel.Size=Vector3.new(1,1,0)pixel.Position=Vector3.new(x,resolution.Y-y,-resolution.X)-Vector3.new(resolution.X/2,resolution.Y/2,0)pixel.Anchored=truepixel.CanCollide=falsepixel.CanTouch=falsepixel.CanQuery=falsepixel.CastShadow=falsepixel.Locked=truepixel.Color=image[x][y]pixel.Material=Enum.Material.SmoothPlasticpixel.Parent=workspaceendendendshowImage(image)
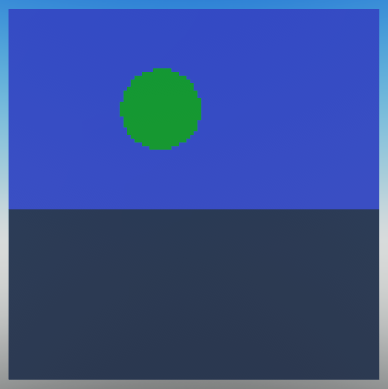
Let's see what the result looks like.
Finally the image is starting to look a little bit more what we expected.
Note
For more advanced sky effects such as time of day, you can simply add the necessary code to the sky shader.